The Microscan MicroHawk MV-40 and ID-40 can run ID code reader or Machine Vision firmware.
These are the steps to boot it to either firmware.
Plug it in
Plug in the power and the Ethernet cable. Get a power and a link light.
Setting IP address
The default IP address and subnet are:
192.168.188.2
255.255.0.0
Set your PC's network card to:
192.168.188.225
255.255.0.0
Open Settings | Ethernet. Click on Change adapter settings.
Right click the Ethernet card, select Properties.
Click Internet Protocol 4
Enter the IP address and subnet:
192.168.188.225
255.255.0.0
Then OK your way back out.
Ping to check connection
Open the command prompt.
Enter the command:
ping 192.168.188.2
You should get 4 replies from the camera if all the IP's are right.
Telnet to camera to change boot settings
Enter the command:
telnet 192.168.188.2
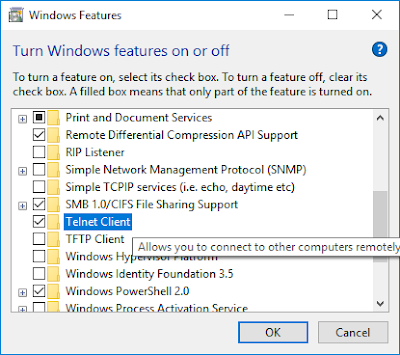
If Telnet doesn't run follow the instructions
here to activate it as a Windows feature:
http://lowtechllcblog.blogspot.com/2018/06/enabling-telnet-on-windows-10.html
You will be asked to log in to the camera
The login is:
target
The password is:
password
Once logged in the prompt will change to ->
To see the camera license enter the command:
BP_Dump
The ID code read license is AutoVision or AutoID, and the Machine Vision license will have a name like MV or Machine Vision.
Check the firmware available (command: sbp)
Command sbp will show the boot parameters
A list of firmwars will be displayed.
There is an arrow [=>] pointing at the firmware the camera is using right now.
In the image above, the camera is using Firmware #4, the machine vision firmware.
Change the boot option (booting a different firmware)(Command: lbp # that is lower case "LBP")
Enter the command lbp 3 [the format is lbp # where # is the number of the firmare in the list]
This will set the camera to boot the AutoID firmare.
The camera will reboot.
To change it back, youo need to Telnet in again and use command lbp 4
Web Page
You can also tell what firmware is running by opening the camera's web page.
Open your browser and enter 192.168.188.2
The ID reader web page looks like:
The Machine Vision web page looks like: